.svg)
Authored by Dale Riechert and Nikhil Punathil
TLDR: If you’re looking for even more advanced Android configurability than available in Esper’s standard Provisioning Template options, we’ve got you covered. You can with our easily customizable JSON Settings. This blog will tell you how.
Esper Device Management
When using an Esper Provisioning Template in the Esper Console to define the specified configuration of Android devices for enrollment, most of the important Android settings can be chosen seamlessly through the template when you look under the Compliance Policy and Settings sections. However, there is a lot more possible with Android that if shown in our Console UI would lead to clutter and confusion for the vast majority of our users.
Rather than restrict our customers to only the important settings, we came up with an advanced means to access the whole set of Android settings using an easily customizable JSON configuration. Here’s the tradeoff - any configuration made using this method will not be registered and available to you through the Esper Cloud, it is done directly with the device. So we encourage you to tread carefully, and use this capability for special circumstances.
Understanding the three categories of Android settings
It’s important to know that Android divides its many various settings across three categories or namespaces called System, Global and Secure. However, different versions of Android, as well as changes made by device manufacturers, make it a challenge to provide a prescriptive list of available settings to Esper customers. Additionally, many of these commands under Global and Secure are only available through privileged access that the manufacturers carefully make available, noting that Esper has this access on many devices, including Lenovo’s line of Android tablets, as well as Esper Foundation for Android-based devices.
If you have a device available that is representative of the prototype for your Android Dedicated Device fleet, you can obtain a precise list through the use of ADB and running the following commands:
Going further, you can test adjusting these settings directly with this command:
For example, let’s say we want to make the text on our devices a little larger to make it easier to read. The appropriate setting is “font_scale”, but note that it uses a float variable where “1.0” is the default, so we’ll go a little larger at “1.15”:
If that works, it’s likely to work via JSON as well, but if not, or if you’re unsure of the setting or value you want, don’t hesitate to contact us if you need help finding or gaining access to the right settings for your needs.
How to change the Android settings using Esper
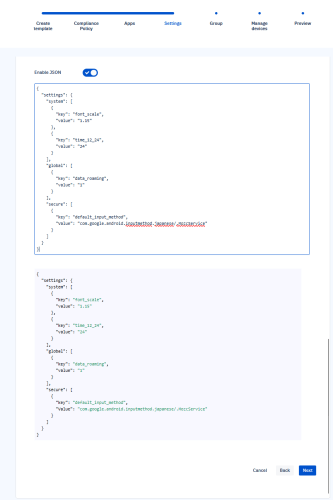
To get started, switch on “Enable JSON” at the bottom of the Settings section of your provisioning template:

Next, we need to determine what to put into our JSON configuration. Corresponding to Android’s namespaces our JSON configuration will have a parent object called “settings” with child objects called “system”, “global”, and “secure”. Then, each of these child objects will have an array to hold the “key” and “value” pairs for each of that namespace’s settings that we want to configure.
Let’s start by reformatting our “font_scale” command into JSON instead. In our JSON’s “system” array, the setting’s “key” will be “font_scale”, and its “value” will be “1.15”. As this is an array, we’ll add one more setting to see what that looks like. “time_12_24” changes the device system clock between 12 hour and 24 hour modes, so to change from our default we’ll use “24” as the value. Altogether, it will look like this:
In another example, let’s say we want to enable the ability for our device with a SIM card to use roaming data. This time the setting we’re looking for is a “global” setting called “data_roaming”, which uses a binary variable where “1” means enabled or “0” means disabled. In our JSON’s “global” array it will look like this:
How to do advanced customization
Now for a bit more complex example, let’s say we want to customize what software keyboard is available on a device. This setting is “default_input_method”, but for the value we need the ID of the desired method to set as default. I want to use Google Japanese Input. With a device available with the keyboard installed on it and ADB set up, you can run the command “adb shell ime list -a” to list the device’s available input methods. For each method it will return a package name and service name such as “com.google.android.inputmethod.japanese/.MozcService”; this is the ID for our JSON. You will need to make sure to also add that keyboard app to your provisioning template so that it will be available on your provisioned devices. Once that is done, you can enter the JSON in the “secure” array like this:
Combining each of our different examples into one single JSON configuration will look like this:
You can simply copy and paste your JSON code into the editing window in your Provisioning Template, or directly input your code into the window. Using our example, here is the JSON code added in. You’ll notice we display it back to you below so you can easily verify the intended settings - simply scroll down and click Next to add the JSON Settings to your Provisioning Template:
Once the provisioning template is saved the custom configuration and other settings chosen in the console UI are ready to be pushed to a new device using the available methods. At the end of the provisioning process, the custom configuration will be applied. Keep in mind that your JSON will override what you have set in the console UI, if there are any conflicts, and so the console UI may no longer accurately reflect every setting. You will have to keep track of any configuration changes made using JSON Settings.
Additional resources
Do you need to apply a custom configuration to a device that has already been provisioned, or are you looking for ways to do even more with custom JSON configurations? Our blog post titled How to Use Namespaces for Advanced Android Configuration goes more in depth to not only use custom configurations to adjust Android settings, but also to adjust some of Esper’s settings with our dpcParams namespace and to execute scripts with our scripts namespace via our API, but you can use these from within a provisioning profile too.
Esper Device Management
FAQ


