.svg)
ADB stands for Android Debug Bridge, a powerful command line tool that you can use to debug your Android phone or tablet and send a large number of commands to control behavior on the device, allowing for the installation of apps and the logging of processes. To achieve that, the tool is composed of three distinct parts.
First, there is the client interface that lives on the machine you use for developing or debugging that sends commands to your device or emulator through the command line terminal. Second, there is a daemon (ADBD) that actually executes the commands you send using the client. It runs in the background on all devices and emulators equipped with ADB. Lastly, there is a server on your development machine that establishes the connection to your device or emulator.
The Android Debug Bridge is included as part of Android Studio, Google’s IDE (Integrated Development Environment) for Android app development, but you can also download it as a standalone tool if you don’t need the full IDE. (The full IDE installation is very large.)
Read more: ADB Remote Debugging
What can you do with ADB?
ADB can be used via the command line on Windows, Linux, macOS, or even ChromeOS on modern Chromebooks. It’s used to interface with Android phones, tablets, or other devices running any version of Android to execute specific commands that are either difficult or impossible from the device itself.
For example, you can use ADB to install standalone APKs (Android app installation packages), move files between your computer and device, run shell commands, take screenshots (or record video of the screen), find detailed information about the device, generate bug reports, view system logs, and a lot more. ADB is also often used when rooting (also known as “jailbreaking”) devices, as well, and works alongside Fastboot to flash the root filesystem. (ADB itself does not have a “rooting” feature, rather, common root exploits published online frequently use ADB to execute the necessary commands to achieve superuser access.)

ADB is a relatively straightforward tool. Each command is prefaced with the ADB command. So, for example, to check for an established ADB connection to a device, you'll use the command ADB devices. If you’re looking for a highly detailed repository of oft-used ADB commands, Automate the Planet has an excellent list.
How to install ADB on your computer
You can get ADB on your computer in a couple of different ways: as part of Android Studio or in a standalone file. Depending on your needs, one of these will almost certainly make more sense than the other.
If you need more than just ADB for development purposes, then you’ll want to install Android Studio. This is the full development environment for Android, so it includes everything you need to build apps and other software for Android. Part of that package is ADB (and fastboot, which is loosely related to ADB — you can think of it like ADB’s cousin), but there are a lot of other elements packaged here, too. If you don’t need a full development environment, Android Studio is likely overkill.
Still, it is the simplest way to get ADB access — simply download the installer for your operating system and you’re good to go. Android Studio is available for Windows, macOS, Linux, and even Chrome OS (this uses the Linux version).
If you don’t need or want Android Studio, however, you can download the standalone SDK Plaform Tools instead. The zip file contains everything you need to use ADB and fastbook in a single, small file. It’s available for Windows, macOS, and Linux (ADB and fastboot are built into the Linux environment for Chrome OS, you just need to set it up).
Using standalone platform tools can be a little more complicated than using Android Studio. If you just need to use it once or only need it sporadically, you can simply use it directly from the unzipped folder by opening a terminal (macOS/Linux) or PowerShell (Windows) window within that folder.
If you’re on Windows and think you’ll need ADB access on a regular basis, it’s probably best to add it to the system PATH. The most straightforward way to do this is to copy the adb.exe, fastboot.exe, AdbWinApi.dll, and AdbWinUsbApi.dll files to the C:\Windows. This add those files to a folder that’s already included in the PATH variable, making this dead simple.
Alternatively, you can add the platform-tools folder to the system path. To do this, you might want to copy it from the download folder and into something like the root of the C:\ drive or into C:\Windows. Once you settle on a location, do the following:
- Right click on My PC in Windows Explorer
- Select “Properties”
- Click on “Advanced System Settings”
- Note: The location of this will vary depending on the Windows version. On Windows 10, it’ll be on the left pane. On Windows 11, it’ll be in “related links” under the Device Specifications section.
- Click the “Environmental Variables” button
- Double-click on “Path” under the User Variables section (the top)
- Click “Browse” and navigate to the folder where you put platform-tools
- Reboot your P
After that, you should be good to go. You can access ADB from any PowerShell window — but you'll need to enable ADB on your Android device first.
How to enable ADB on Android
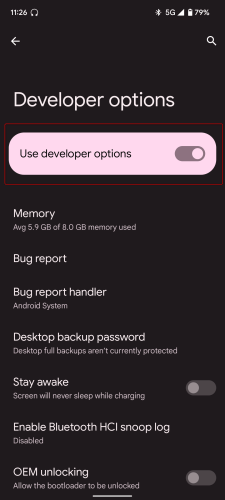
In order to use ADB on your Android device, you’ll need to first enable the Developer Options menu.
- Head into the device’s Settings menu
- Select About Phone
- Tap the build number seven times
- You may need to enter your biometric or lockscreen passcode info, but after that, a toast notification at the bottom of the screen will show a “congratulations, you are now a developer” message (if only it was so easy to actually become a developer)


After that, there will be a new section in the Settings (or Settings > System) menu for Developer Options.
- Jump into that menu
- Enable the USB Debugging toggle
- A warning may pop up here to let you know the dangers of enabled USB Debugging since these are powerful developer tools. Accept this to enable the feature.
And with that, you’re ready to start using ADB.


How to disable ADB on Android
To disable USB debugging (and ADB), jump back into the Developer Options and flip the USB debugging toggle to the off position. Alternatively, you can completely disable Developer Options by flipping the toggle at the very top.

How to use ADB commands
With everything set up, connect your Android device to your computer over USB, then open a command prompt in the platform tools folder. If you downloaded platform tools without Android Studio, this folder will likely be in your downloads folder. Once in the platform tools folder, shift + right click (Windows) > Open PowerShell window here.

Note: On Windows 11, you’ll need to click the “Show more option” button to open the traditional context menu.
If you installed Android Studio, you’ll need to navigate to the install location from the command line, Open Android Studio, then select More Actions > SDK Manager. At the top of this window, you’ll set the location of the Android SDK, Copy this location, then open a command prompt (if you haven’t already). Type cd then paste the copied location.

Once in that folder, type cd platform-tools. Boom, you’re in.

Now, with your Android device connected over USB and your command prompt open, type adb devices. The daemon will launch and look for connected devices. If this is your first time running adb on that device (and we’ll assume it is), you’ll need to grab it and authorize the connection. You can also tick the box so Android will remember this connection in the future so you won’t have to re-authorize it every time.

After authorization, try the adb devices command again. It shook look similar to this:

And that’s that — you’re ready to start cutting your teeth on ADB commands. To give it a whirl, try adb reboot to reboot the connected device.
If you think you’ll use ADB on this device often, you can also enable Wireless debugging (only available on Android 11 and up), which allows you to connect to the Android device over Wi-Fi. Fancy.


On your Android device, jump back into the Developer Options menu, then scroll down to “Wireless debugging” and toggle it. A similar authorization popup will appear, asking you to authorize the currently-connected Wi-Fi network. With this option enabled, you can remotely connect to your Android device as long as it’s on the same network as your computer. Use the command adb connect <IP address> to enable a remote connection. You can find this info in Developer options > Wireless debugging.

- adb kill-server: Kills the ADB server
- adb shell: Launches a shell terminal
- adb start-server: Starts the ADB daemon
- adb reboot: Reboots the connected devices
- adb reboot-recovery: Restarts the device in recovery mode
- adb reboot fastboot: Restarts the device in fastboot mode
- adb get-state: Pulls the current device state
- adb get-serialno: Pulls the connected device's serial number
- adb shell install <apk>: Installs an APK package onto the connected device
- adb shell uninstall <apk>: Removes the named APK package from the connected device
- adb push <local file location> <remote file location>: Copies a file from the computer to the device
- adb pull <remote file location> <local file location>: Copies a file from the device to the computer
- adb shell list packages: Lists all installed APK packages
- adb shell ls: Lists the contents of the current directory
- adb shell screencap /path/to/screenshot.png: Takes a screenshot
- adb shell screenrecord /path/to/video.mp4: Takes a screen recording
- adb bugreport: Create a bug report
- adb logcat: Dumps a log of system messages
- adb help: Lists all ADB commands
- exit: Closes the terminal window
ADB “no devices/emulators found” error
When you type adb devices, there’s a chance nothing will show up. No list of devices, no errors, nothing. Assuming everything on the Android device is configured properly, you may have a USB driver issue.
If you haven’t already, the first thing to try is installing Google’s USB driver. You can grab the download directly from Google, but it’s also available directly in Android Studio. Click the More Options button, then open the SDK Manager.

From there, click into SDK Tools, then tick the box next to Google USB Driver. Finally, click the Apply button. You’ll need to confirm the change, after which it should only take a few seconds to install.

Once it’s finished, give it another go. With any luck, everything will work.
If not, well, things get a little more complicated because it likely requires an OEM driver from the Android device’s manufacturer. The good news is that Google has a page that links to most Android manufacturers and their driver downloads. Be sure that if you do install a specific USB driver that your operating system is actually using that driver for the connected Android device, and not a generic driver (which an OS like Windows may prefer).
How to use ADB in Android Studio for Android app debugging and testing
If you want to debug and test Android apps, you’ll have to use Android Studio. Make sure that you’re running a debuggable version of your app (you should be able to use the default debug variant that’s included in every Android Studio project) and add some breakpoints to your application. Then you can select the device you want to debug from in the Android Studio toolbar. Select the green bug debug icon to the right of it to do that. You may be asked to restart your app to switch its mode from running to debugging.
Usually, the debugger will automatically detect the best mode to run in, depending on which programming language you primarily use for your app. You can select your preference, though, and switch between Java, Native (for C and C++), or Dual (for both).
These are just the very basics of this process. Once you’re more familiar with everything, check out Google’s instructions on more advanced debugging methods. You can also use the help query in your command line tool to dive into everything that ADB has to offer: ADB --help.
ADB tricks and tips
Apart from debugging your apps, you can use ADB for a lot of practical scenarios. The command line tool (and clever usage of scripting) can make your life much easier and simplify a lot of processes that would otherwise require you to interact directly with your device.
How to interact with multiple devices over ADB
Should you have more than one device or emulator attached, you also need to specify which you want to send your commands to. You can do that with the ADB [-d |-e | -s serial_number] syntax, where -d can be used for a single USB device while one or more emulators are connected, -e for a single emulator when one or more USB devices are connected, and -s serial_number when you need to specify which device to send commands to via its serial number.
How to install (multiple) APKs using ADB
ADB is a powerful tool to manage apps in your test environment. It can be used to push one or more apps at once. Follow these steps to get started with multi-package installation:
- Move all the APKs you want to install in a single folder
- Make sure that you don’t have any spaces in the package names. The command may not work otherwise
- Connect your Android device or start your emulator (Make sure you’ve activated developer options and USB debugging)
- Make sure your client recognizes the device using ADB devices
- Open a terminal or command prompt window and navigate to the folder with the APK files
- Run the following command: for file in *.apk; do ADB install $file; done
This is all there is to the process. There are other options for installing multiple APKs, but using the command above is probably the simplest route.
How to reset and restore your phone using ADB
Routinely resetting your phone to give you a clean development environment can get cumbersome. That’s especially true when you need to do it via your phone’s small touchscreen all the time. ADB can help out with this, too. Just follow these steps:
- Connect your Android device with your computer
- Ensure that you’ve activated developer options and USB debugging
- Use the ADB devices command to confirm that your device is connected
- Enter the ADB shell by typing just that: ADB shell, followed by enter
- Type recovery --wipe_data followed by enter or, if that fails, wipe data, followed by enter
- Your phone should then start the reset process, leaving you with a clean slate once it’s done
Resetting a phone for development purposes using ADB is fine. If you want to reset your device to sell it or give it away, it’s best to do it the old fashioned way via the system settings, though. This will ensure that your Google account is properly unlinked from the device, which could otherwise hinder the new owner from setting it up with their own account.
How to use scrcpy to see control your Android device from your computer
Some third-party programs can hook into ADB to provide extra functionality. Scrcpy is one such application. It’s a command line tool that allows you to stream your Android screen to your computer. With it, you can do screen recordings right from your computer. You can also use it to interact with the apps you’re debugging right on your computer, too.
To get started with scrcpy, you need to install it on your machine using either of these methods, as specified on the service’s Github page:
- Linux: Open a terminal and type apt install scrcpy, followed by enter
- Windows: Download the project as a ZIP file and unpack it
- macOS: Open a terminal and type brew install scrcpy, followed by enter
For the macOS variant, make sure you install Homebrew first. Otherwise, the command will not work.
Once you’re all set with this, connect your Android device, make sure you’ve got USB debugging enabled, and run the scrcpy command. This will start the service, and you will be able to see your phone screen mirrored on your computer.
To take a screen recording, you need to use the scrcpy -r command. You can specify a custom file name via --record file.mp4, and you can change to file format using --record-format mp4 or mkv. You can generate a list of all available commands using the scrcpy --help command.
Read more: ADB Remote Debugging
More Android MDM Resources:
FAQ
ADB debugging is a way for Android devices to communicate with developer tools over USB. You can send files, commands, and more from a connected computer to a connected device.
To enable USB debugging, you first need to enable Android’s hidden Developer Options menu. You can unlock this menu by tapping the build number seven times, then heading in and flipping the USB debugging toggle. We have more detailed instructions above.
You can use ADB to install standalone APKs (Android app installation packages), move files between your computer and device, run shell commands, take screenshots (or record video of the screen), find detailed information about the device, generate bug reports, view system logs, and a lot more.
Generally speaking, ADB is a safe tool but it’s all about knowing what each command does. If you’re not sure, the best course of action is to avoid using ADB or running that particular command.
To disable USB debugging, head into Android’s Developer Options menu and flip the USB debugging toggle to off.


