.svg)
Welcome to the second edition of my Android Dessert Bites column, and thanks to everyone who signed up for The Android Edge newsletter! We hope you stick around, because things are just starting to get interesting again in the world of Android. We have a lot of news to share on what’s coming next for the Android platform, but this week's column is light on news content so we can all enjoy this short break. Instead, I’ll be sharing some advanced tips and tricks that I’ve been stockpiling.
Android Device Management
Want to add a bit of personal flair to your Android TV home screen? Ever wonder where Google hid the screen on time since the last full charge on Android 12? Question why the theme color selection is so limited on your Pixel device? Can’t figure out why the Android Emulator is broken on Windows 11? We'll answer these and more in this week’s Android Dessert Bites.
Hide the ads from your Android TV or Google TV home screen
Large screen, high resolution televisions are more affordable than they’ve ever been. It’s amazing how little you have to pay to pick up a 65” 4K TV (especially today). The problem for TV makers is that most people won’t buy a new TV for half a decade or even longer. That’s why your “smart TV” is usually loaded with apps and services that earn the TV maker a bit of post-sales dough.
On Android TV and Google TV devices, Google owns the home screen launcher, which it takes advantage of to show “staff picks”, “recommendations”, “highlights” and other content that many see as basically just advertisements (just look at the Android TV Home app’s Play Store reviews). Neither Android TV nor Google TV offer the option to choose a different launcher like Android on your smartphone does, so most users are stuck with Google’s launcher. Fortunately, both Android TV and Google TV still expose the same development tools that are available for other versions of Android, and through ADB shell, it’s possible to disable the Android TV Home or Google TV Home to make the third-party launcher of your choice the default instead.

Here’s a short guide on what you need to do:
- First, install the third-party launcher app of your choice. I personally use Sideload Channel Launcher 3 because of the number of features it offers, but it costs a few bucks. If you want a free and open source launcher, your only option is FLauncher.
- Enable Developer Options on your Android TV or Google TV device
- Enable “ADB Debugging” (most Android TV devices) or “Network Debugging” (SHIELD TV)
- Find your TV’s IP address
a. On most Android TVs, simply go to network settings and highlight your network.
b. On SHIELD TV, this is conveniently listed in the text description under the “Network debugging” toggle. - On a PC connected to the same network as your TV, open a terminal or command prompt and enter:
adb connect <TV’s ip address> - On your TV, you’ll be prompted to “allow USB debugging”. Use your remote to select “allow”. Check “always allow from this computer” if you wish to avoid this dialog in the future.
- On your PC, enter the following command to disable the stock launcher.
For Android TV:
adb shell pm disable-user --user 0 com.google.android.tvlauncher
For Google TV:
adb shell pm disable-user --user 0 com.google.android.apps.tv.launcherx
adb shell pm disable-user --user 0 com.google.android.tungsten.setupwraith - Now press the home button on your remote, and you should see a prompt to set your launcher of choice as the default. This launcher will now appear whenever you press the home button on your remote.
- Finally, you’ll want to grant any permissions the launcher requests, but there’s one permission you’ll have to return to ADB to grant: app widget binding. Without this permission, the launcher can’t bind to and show widgets on the home screen. To grant this permission, run the following command:
adb shell appwidget grantbind --package [launcher_package_name] --user 0
Note that the launcher you download might not use this permission, so if not, sending this won't do anything. - If for any reason you want to re-enable the stock launcher, then simply run the following commands:
For Android TV:
adb shell pm enable com.google.android.tvlauncher
For Google TV:
adb shell pm enable com.google.android.apps.tv.launcherx
adb shell pm enable com.google.android.tungsten.setupwraith
Note that following these steps won’t impact updates to your TV, void your TV’s warranty, or permanently uninstall the stock launcher. However, there is one big caveat with switching to a third-party launcher on Android TV. Third-party launchers are not allowed to interface with the system app that controls content recommendations, which means you won’t see some useful rows like “Play Next” which shows content like unfinished programs, the next episode in a series, and more.
This tutorial was inspired by this post on Reddit by user kurmudgeon over on the Android TV community, so kudos to them.
Android 12 on Pixel won’t show you the old Screen on Time (SOT) metrics, but it’s still tracked
If you upgraded your Pixel phone to Android 12 (or bought a Pixel 6 with it preinstalled), then you may have noticed a rather annoying change to battery stats: everything is tracked from the “past 24 hours” rather than “since last full charge.” We’re not really sure who this change benefits, as it only makes it more difficult to see which apps are draining your phone’s battery. A 24-hour period can also include multiple charging cycles, making the data even harder to analyze.
Fortunately, there’s still a way to get the old screen on time data from Android 12, even though Google hid it from the battery usage page. Android’s ‘batterystats’ system service still tracks the screen on time since the last full charge, alongside a plethora of other battery and charging-related statistics, and you can grab that data by running the ‘dumpsys’ tool through ADB shell.
If you run:
dumpsys batterystats --charged
...you'll get (way too much) information about your phone’s battery history since the last full charge, so instead pipe the output through grep to narrow it down to just the line we want:
dumpsys batterystats --charged | grep -m1 'Screen on: '
and you should have the data you’re looking for. (Thanks to developer @agnosticapollo for sharing the command!)

As a sidenote, if you’d rather not run these commands from your PC through ADB shell, there are apps on Google Play that enable running shell commands with the same privileges as ADB shell. These apps leverage Android’s built-in support for ADB over WiFi and are must-haves if you’re deep into phone automation.
If you don’t have a Pixel phone, you may not need to jump hoops to get the old “screen on time since last full charge” metric. That’s because the new battery usage page you see on Pixel phones running Android 12 isn’t enabled in AOSP. For once, we’re glad that Google made a change that’s Pixel-exclusive.
Choose your own colors
Google’s new wallpaper-based dynamic theming system certainly lives up to Material You’s tenet of personalization, but it isn’t very customizable. Once you pick a wallpaper, the theming system does its magic without any input from the user. It extracts colors, generates a palette, filters those colors, and then exposes those colors to system apps and third-party apps. After the theme change, though, users can pick from a handful of alternative palettes, as well as some “basic” color options, in the “Wallpaper & style” app. However, if you want full control over the colors on Android 12, then you’ll have to get your hands a bit dirty.
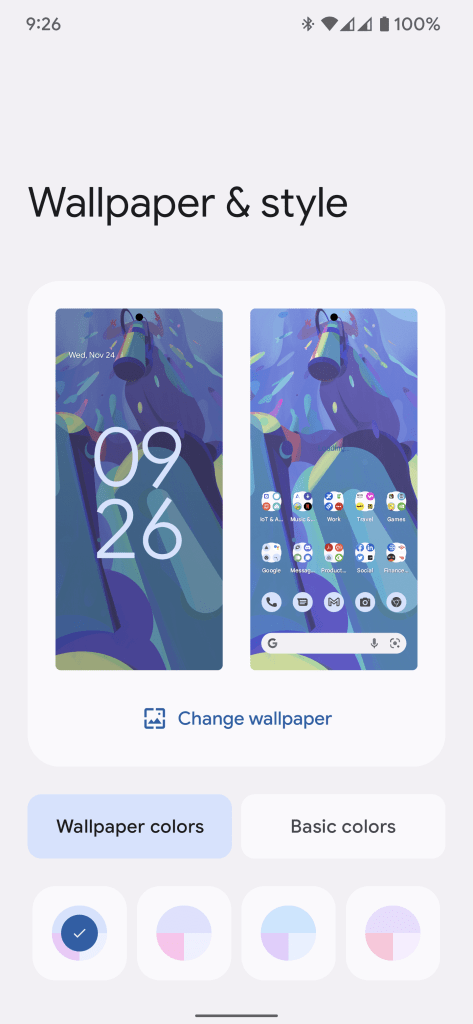
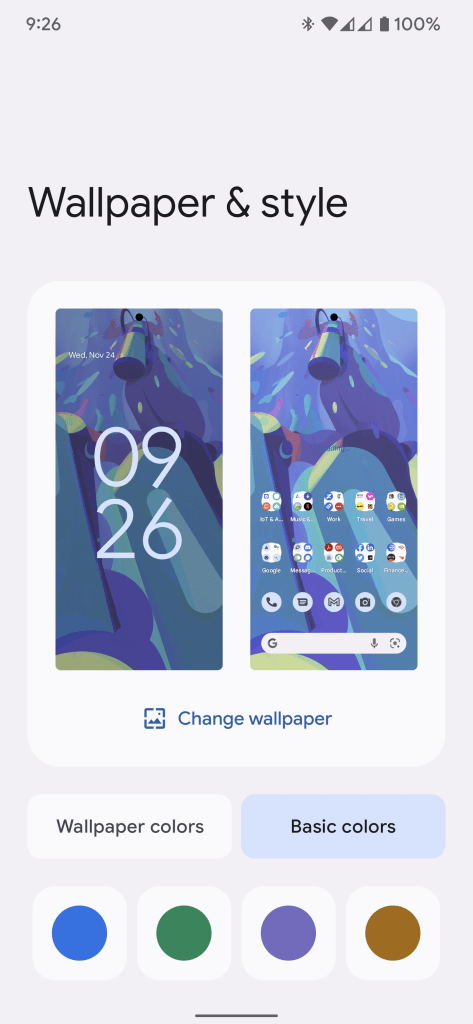
To customize colors, there are two routes you can take. The first route will let you pick the three main colors that the theming system will use to generate the rest of the colors from, while the second route bypasses the theming system entirely and tells the system what each color should be.
Route 1: The Live Wallpaper trick
Go to Google Play and install the free “LWP+” app. Open it and then tap “set as current live wallpaper.” Next, tap on “wallpaper type” and select “cropped image” to set a custom image as your wallpaper. Alternatively, you can set your wallpaper to use a solid background color or an animated GIF/WEBP file.
In any case, once you’re done, make sure “use custom colors” are checked in the app and then choose the primary, secondary, and tertiary colors. These are the first, second, and third most preeminent colors of the wallpaper; for normal wallpapers, Android extracts these colors itself, but in the case of a live wallpaper, the theme engine uses the colors reported by the live wallpaper as a WallpaperColors object.
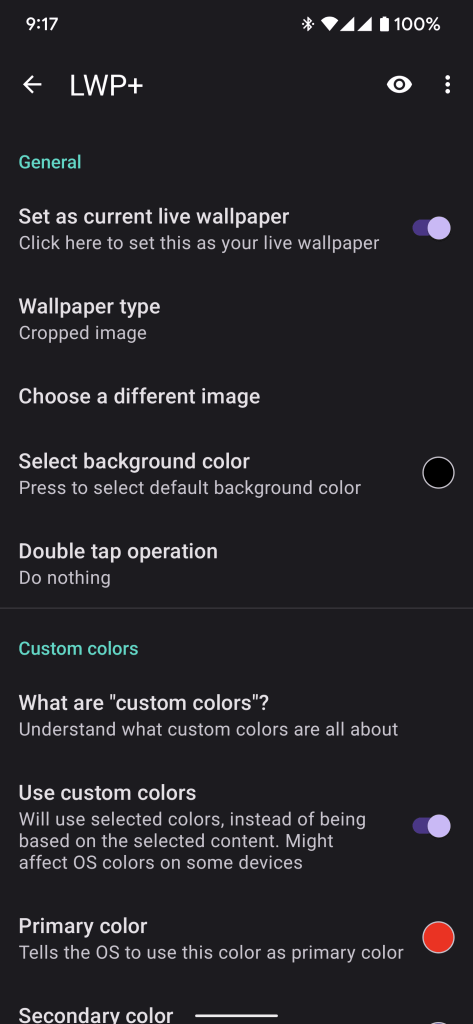
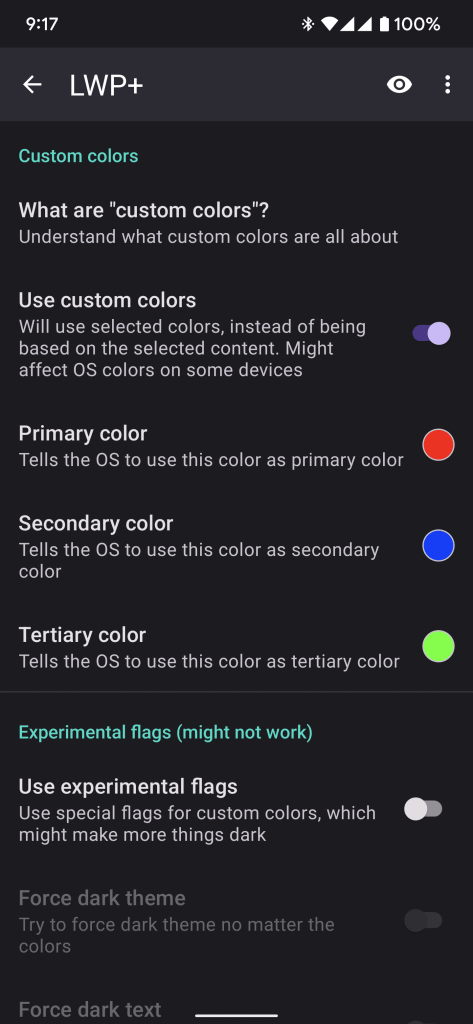
Credit to Redditor /u/rhamej for sharing this app!
Route 2: Make your own overlay
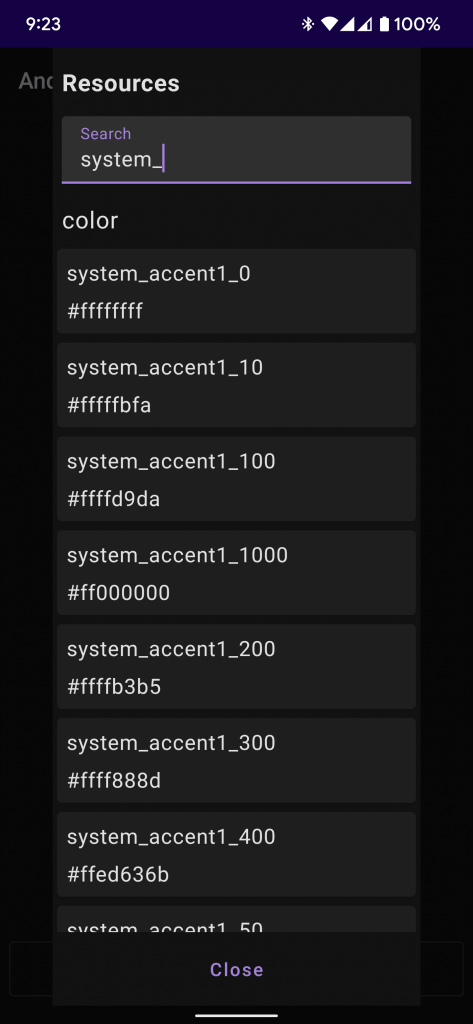
Android 12 added a new API to help platform engineers make resource configuration changes without needing to manually create, compile, sign, and push a runtime resource overlay (RRO). The Fabricated Overlay API can override booleans, integers, dimensions, and, what’s important here, colors. Since the colors that the theming engine generates are stored as a resource value of the “Android System” package, we can fabricate an overlay that overrides them.
The only problem is that there’s a lot of values to override. 65, to be exact. Now, you don’t need to override each and every color value, but if you don’t, you might come across a jarring clash of colors from time to time. If you’re interested in going this route, this Reddit thread by user The-Dragonborn outlines the steps you need to take.
It’s worth noting that, without superuser access, the command line interface for the Fabricated Overlay API is off limits. The app mentioned in the Reddit thread instead directly calls the API as the shell user, which we believe to be a loophole that will surely be patched soon. In other words, don’t count on this to work forever.
Fix the Android Emulator on Windows 11
I’m sure you’ve heard by now how amazing Apple’s new M1 Macs are at cutting down build times. A tweet by Reddit software developer Jameson Williams went viral for claiming that the 2021 M1 Max MacBook cut their Android build times in half compared to a 2019 Intel i9 MacBook. (Jameson elaborated on his “napkin numbers” a bit further in a post on /r/RedditEng.) No matter how good the new MacBooks are, though, not every developer will have access to one, either for work or personal use. If you use Windows for Android development, then you may want to be aware of a bug that prevents the Android Emulator from booting on certain machines running Windows 11.
Many Windows 11 PCs with Hyper-V enabled are unable to boot the official Android Emulator, which is currently the only official way to test Android 12L. This issue seems to affect PCs with both Intel and AMD processors, as noted by reports on Reddit, Stack Overflow, and the Google Issue Tracker. Thanks to skillful debugging from a few users, it was discovered that the xsave disable code in the WHPX API integration was the root cause, as CET (Control-Flow Enforcement Technology) requires xsave on Windows 11. Google has a fix that resolves this issue, and I was told that it has been implemented in version 31.1.3 of the Android Emulator.

Version 31.1.3 of the Android Emulator is available right now if you switch to the canary channel, so be sure to check for an update!
Thanks for reading this week’s edition of Android Dessert Bites. I wanted to share at least one useful tip each for journalists, power users, and developers. These are topics I haven’t seen much coverage of and I’ve always wanted to personally cover, so it was the perfect time for me to share what I know.
If you have any questions or an issue you want me to investigate, please feel free to reach out to me at mishaal@esper.io! I’ll try to respond to you personally if I know the answer.
We’ll be back next week with news and insights on the latest developments in the Android platform. As a reminder, the Android Dessert Bites column provides a sampling of the news that you won’t find in many other places, while the Esper blog is where to go if you want a broader, in-depth overview of the latest developments in the Android platform.
Android Device Management
FAQ


